
This guide will help you to create a free website on blogspot (aka blogger), you don’t need to buy domain and hosting services. Blogspot is a platform which allows you to build and host website for free, it is owned by Google so, you don’t have to worry about server down time and other issues.
Moreover, there are thousands of free blogger templates which you can use to give a professional look to your website. Let’s begin with the step by step guide for creating a website for free.
STEP 1: Login to Blogger
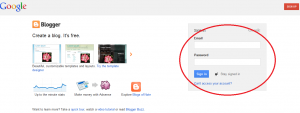
Go to http://www.blogger.com/home and sign in with your gmail id and password, if you don’t have an account, you can create it for free by clicking on the “sign up” button at the top right corner as shown in the screenshot. Blogger belongs to Google that’s the reason why, you would be needing a gmail account for building a website on blogspot.
STEP 2: Confirm Your Profile
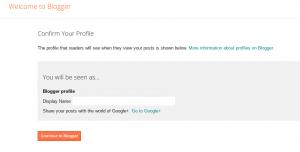
Once you are done with logging in with your gmail credentials, you will be seeing a screen like the above one. Click on “Continue to Blogger“.
STEP 3: Create a New Blog
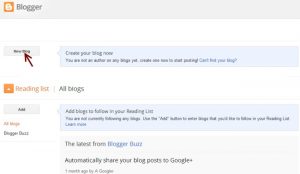
It’s time to create a new website, click on the “New Blog” button.
STEP 4: Provide Website’s Domain Name and Title
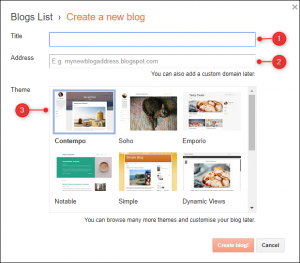
In this step, you would need to provide the title and address of your website. You must know that, since these domain names are free, they would be suffixed with blogspot.com by default. Blogspot, also provides us with the option of buying custom domain names.
The domain name must be unique. There are chances that the domain name you wanna choose is already registered. In that case you must need to try a different domain name until and unless a blue tick appears at the right side of the Address field.
Once it’s done, choose a template (you can choose any template at this point, you would be able to change it later at any point of time.) and click on “Create Blog!”
STEP 5: Offer for an Optional Personalized Domain
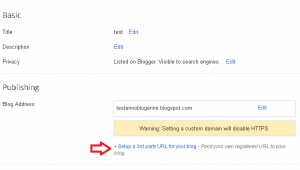
You may be prompted to find a personalized domain name for your new blog immediately. If you want to do this, scroll through the list of suggested domains, view the price per year, and make your choice. Otherwise, skip this option.
STEP 6: Write Your First Post
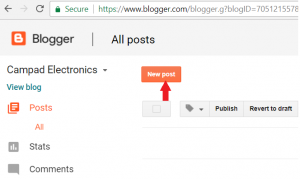
You’re now ready to write your first blog post on your new Blogger.com blog. Don’t be intimidated by the empty screen.
Click on the “Create a New Post” button to get started. Type a brief message in the field and click the Preview button at the top of the screen to see what your post will look like in the theme you selected. The Preview loads in a new tab, but this action does not publish the post.
Your preview may look exactly like you want, or you may if wish you could make something bigger or bolder to get attention. And that’s where formatting comes in. Close the Preview tab and return to the tab where you are composing your post and start formatting your post according to your wish.
STEP 7: Visit Your Website
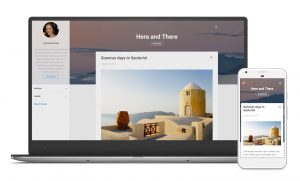
Give your website’s address in the browser and press enter. You would be presented with a website, which you own!! If you don’t like the look and layout of your website, there are many free themes or templates available online which you could download for free.